Mountain biking is a thrilling adventure that combines excitement with the beauty of nature. Whether you’re riding through lush forests, conquering rocky hills, or gliding down peaceful valleys, every ride offers a chance to explore new landscapes and gain a fresh perspective. However, for beginners, the world of mountain biking can be intimidating. With unfamiliar terms, daunting equipment choices, and the uncertainty of what lies ahead on the trails, it’s easy to feel overwhelmed.
If you’re interested in beginner mountain biking but find yourself confused by technical jargon or trail maps filled with cryptic symbols, don’t worry—you’re not alone. Many new riders share these concerns:
- Am I choosing the right trail for my skill level?
- What gear do I really need to get started?
- How do I navigate steep descents or rough sections without crashing?
This Beginner’s Guide to Mountain Biking Trails is here to help. It’s specifically designed for individuals who are eager to start exploring the world of mountain biking but aren’t quite sure where to begin. Inside this guide, you’ll find clear explanations of key concepts, practical tips on selecting your first trails and gear, as well as helpful advice for building your skills with confidence. Our goal is simple: we want to remove any confusion so that you can focus on what truly matters—enjoying every moment spent out on the trails!
Understanding Mountain Biking Basics
Mountain Biking Terminology
Understanding the lingo is crucial for beginners.
Here are some key terms from this crash course in MTB lingo:
- Singletrack: A narrow trail that usually accommodates one bike at a time.
- Doubletrack: A wider trail, often used by off-road vehicles, and typically allows side-by-side riding.
- Berm: A banked turn designed to help riders maintain speed through corners.
- Loam: Soft, rich soil that provides excellent traction for mountain biking.
Bike Types
Choosing the right bike is vital. Beginners often debate between hardtail and full suspension bikes.
- Hardtail Bikes
- Pros: Generally lighter and less expensive. Easier maintenance due to fewer components.
- Cons: Less forgiving on rough terrain because of the lack of rear suspension.
- Full Suspension Bikes
- Pros: Better control and comfort on rough trails thanks to front and rear suspension.
- Cons: Heavier and more expensive. More complex maintenance.
Pedal Types
Selecting pedals is another important decision:
- Flat Pedals
- Pros: Easy to use; better for learning basic skills. Allows quick foot removal in tricky situations.
- Cons: Less efficient in transferring power compared to clipless pedals.
- Clipless Pedals
- Pros: Improved power transfer and efficiency. Keeps feet securely in place for better control.
- Cons: Learning curve for clipping in and out; can be intimidating for beginners.
Trail Types
Understanding the nature of trails helps in choosing the right ones:
- Flowy Trails: Characterized by smooth surfaces and gentle curves, ideal for beginners looking for a fun ride without technical challenges.
- Technical Trails: Include rocky sections, roots, steep climbs, and drops. These require more skill and experience, presenting a greater challenge.
By grasping these basics, you can make informed decisions about your equipment and trail choices, setting you up for an enjoyable mountain biking experience.
Selecting Appropriate Beginner Trails
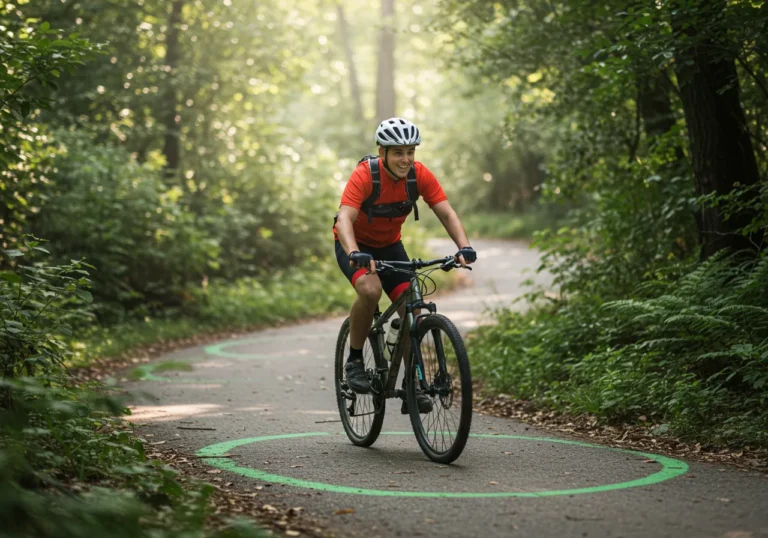
Choosing the right trail is the foundation of a positive mountain biking experience. Beginner mountain biking trails are specifically designed to build confidence, minimize risk, and allow you to focus on skills rather than survival. The most beginner-friendly routes are marked with a green circle—a universal symbol for easy trails. These are the best places to start if you’re new to the sport or still working on basic handling.
What Makes a Trail Beginner-Friendly?
Look for these characteristics when selecting your first trails:
- Smooth Surface: Fewer rocks, roots, or technical features mean less chance of getting hung up or taking a fall.
- Gentle Grades: Easy climbs and mellow descents keep things manageable. You won’t face steep pitches that can sap your energy or test your braking skills prematurely.
- Wide Trail Width: Doubletrack or wide singletrack gives you more room to maneuver, pass other riders, and recover from mistakes.
- Clearly Marked Features: Beginner trails often have signs warning about upcoming turns or features, reducing surprises.
A trail described as “flowy” with minimal technical obstacles is ideal for learning core skills and gaining comfort on the bike.
Utilizing Technology and Local Resources
Access to information has never been easier thanks to digital tools and local expertise.
Two standout apps simplify trail selection:
- MTB Project App
- Offers detailed trail maps with difficulty ratings (including green circle/easy).
- Includes rider reviews, photos, and descriptions of trail conditions.
- GPS navigation features let you track your progress in real-time.
- Trailforks App
- Interactive maps show trail networks by region with color-coded difficulty.
- Community-sourced updates provide warnings about closures or hazards.
- Route planning capabilities help you link together beginner loops.
Both apps allow you to search specifically for “beginner mountain biking trails,” filtering out advanced routes so you don’t end up somewhere outside your comfort zone.
Tapping Into Local Knowledge
No app can replace advice from people who ride the trails regularly. Local bike shops are hubs of information—they know which trails are well-maintained, heavily trafficked, or perfect for newcomers. Ask staff for their top picks and any seasonal factors affecting local trails. Many riders find mentorship through shop-organized group rides or clinics.
Experienced friends offer another layer of insight. They’re often happy to share tips on what makes certain green circle trails more fun or less intimidating for new riders. Joining community Facebook groups or online forums dedicated to your area can connect you with riding buddies and up-to-date recommendations.
The right information transforms trail selection from guesswork into an enjoyable part of the journey.
Essential Skills for Beginners on Trails
Building a foundation of mountain biking skills for beginners starts with mastering core riding techniques. These basics shape your confidence and safety on every ride.
Handling and Control Techniques
Relaxed Grip on Handlebars
A common mistake among new riders is gripping the handlebars too tightly. When you tense up, your upper body absorbs trail vibrations poorly, which leads to fatigue and less control. A relaxed grip on handlebars keeps your arms loose and responsive, allowing the bike to move naturally underneath you.
- Tip: Imagine holding a small bird—firm enough so it won’t fly away, gentle enough not to harm it.
- On rough descents or rocky stretches, keep elbows slightly bent and shoulders loose.
- Let the bike float over obstacles rather than fighting every bump.
Riders who develop this relaxed grip early can better handle unexpected roots, ruts, or rocks. You’ll notice improved balance and less hand fatigue after longer rides.
Smooth Braking Technique
Slamming on the brakes leads to skidding, loss of traction, or even going over the bars. Learning smooth braking technique is a priority for anyone tackling mountain biking skills as a beginner.
- Use one or two fingers on each brake lever for maximum control.
- Apply pressure gradually rather than all at once.
- Focus more braking force on the front brake (which does most of the stopping), but never lock it up.
- Before entering corners or technical features, slow down ahead of time while still traveling in a straight line.
Corners are where mistakes often happen. Entering too fast and grabbing a handful of brake mid-turn tends to wash out your front tire. Instead:
Brake before you reach the turn, then ease off as you steer through the corner.
Practicing this outside of high-pressure trial situations helps embed muscle memory. Short sessions in an empty parking lot—working on controlled stops from different speeds—can build confidence before hitting actual trails.
Body Position Awareness
Standing up with pedals level is a fundamental skill when navigating uneven terrain or descending. This position lowers your center of gravity and allows your legs to act as shock absorbers.
- Keep knees and elbows soft and slightly bent.
- Hinge from your hips rather than rounding your back.
- Stay centered over the bike with eyes looking ahead—not down at your front wheel.
Mastering these beginner riding techniques makes handling unpredictable trail surfaces much easier. Each ride becomes less about survival and more about fun progression, opening up new trail possibilities as skills develop.
Next comes vision and focus. Learning how to scan the trail ahead and choose smooth lines through obstacles is an essential step toward riding with confidence.
Vision and Focus on Trails
Mastering fundamental riding techniques is crucial to building confidence on mountain biking trails. One essential skill for beginners is learning how to anticipate your line through technical features.
Line Choice
Look ahead instead of fixating on obstacles directly in front of you. This approach allows you to anticipate changes in terrain and make smoother transitions.
Vision Techniques
Maintain a relaxed grip on the handlebars, ensuring better control during descents or rough sections of the trail. Smooth braking technique helps prevent skidding or losing traction, especially while maneuvering through corners.
By focusing your vision on where you want to ride rather than on obstacles, you improve your ability to navigate challenging terrain efficiently.
These techniques, combined with consistent practice, significantly enhance your mountain biking skills as a beginner.
Gear and Equipment Recommendations for Beginners
Choosing Your First Mountain Bike
When selecting your first mountain bike, several key factors need to be considered to ensure a smooth and enjoyable riding experience:
- Size: Bike fit is crucial for comfort and control. Most manufacturers provide size charts based on height, but it’s also essential to test ride different sizes if possible. A proper fit allows for better handling and reduces the risk of injury.
- Intended Use: Determine whether you’ll be riding cross-country trails or tackling more challenging downhill routes. Cross-country bikes are typically lighter with less suspension travel, making them ideal for longer rides on varied terrain. Downhill bikes, on the other hand, have robust frames and greater suspension travel to handle steep, technical descents.
- Budget Constraints: Beginner-friendly bikes range from a few hundred to several thousand dollars. Establish a budget that balances quality and affordability. Many reputable brands offer entry-level models that provide excellent performance without breaking the bank. Look for deals on previous year models or consider buying used from reputable sources.
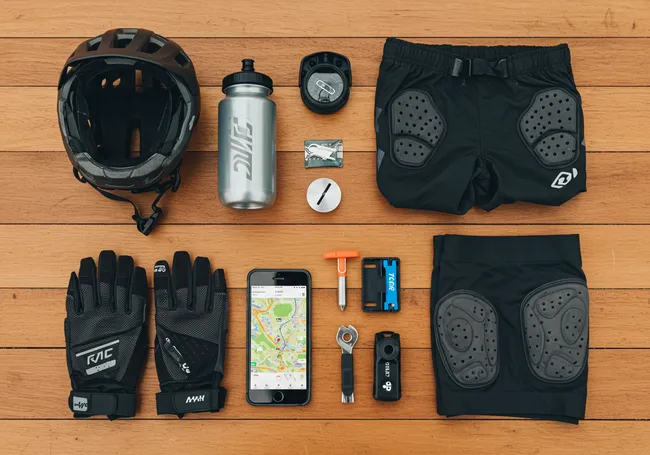
Protective Gear for Mountain Biking
Safety should always be a top priority, especially when you’re new to mountain biking.
Essential protective gear includes:
- Helmet: A well-fitted helmet is non-negotiable. Options like the Smith Engage MIPS or Fox Speedframe MIPS offer advanced protection with multi-directional impact protection systems.
- Elbow and Knee Pads: These pads protect your joints during falls or crashes. Brands like G-Form and Fox provide durable options with flexible padding for comfort.
- Gloves: Full-finger gloves enhance grip and protect your hands from abrasions.
- Sunglasses or Goggles: Protect your eyes from dust, debris, and sunlight.
- Shoes: Sturdy mountain bike shoes with good grip are essential. Flat pedal shoes like those from Five Ten provide excellent traction.
Clothing Essentials
Comfortable and durable clothing makes a significant difference when you’re out on the trails:
- Padded Shorts (Chamois): These provide cushioning for long rides, reducing discomfort.
- Durable Shorts and Long Sleeve Shirts: Look for materials that are both breathable and resistant to tears.
- Lightweight Jackets: Ideal for changing weather conditions.
- Hydration Packs or Waist Packs: Carry enough water and essentials like snacks, tools, and spare tubes.
Transporting Your Mountain Bike to Trails
Getting your bike to the trailhead can be another consideration:
- Hitch Racks: Designed for cars/SUVs, these racks securely hold your bike in place during transport.
- Tailgate Pads: Specifically made for trucks, these pads allow you to drape your bike over the tailgate without causing damage.
By investing in appropriate beginner mountain biking gear and ensuring you have all the necessary equipment, you set yourself up for safer, more enjoyable rides as you explore new terrains.
Transporting Your Mountain Bike to Trails
Getting your bike to the trailhead safely and easily is a key part of every ride. The most common solution for transporting mountain bikes with cars and SUVs is a hitch rack. These racks attach securely to your vehicle’s hitch receiver, keeping your bike stable on highways and rough roads alike. Many beginner riders opt for tray-style hitch racks because they support the bike by its wheels, reducing frame contact and the risk of scratches. Popular brands include Thule, Yakima, and Kuat.
For truck owners, tailgate pads are a practical alternative. These padded covers drape over the tailgate, allowing you to hang several bikes over the back without damaging paint or components. A good tailgate pad keeps bikes separated and prevents shifting during transport—a major plus if you’re heading out with friends.
When planning your first rides, don’t overlook simple essentials that make transportation easier:
- Bungee cords or straps: Secure loose wheels or keep handlebars from swinging.
- Protective blankets or foam tubing: Prevents scratches when carrying multiple bikes inside a vehicle.
A well-chosen transport setup not only protects your investment but also makes it easier to ride new trails as you progress.
Building Confidence Through Practice and Community Support
Consistent practice is crucial for improving mountain biking skills for beginners. Every ride adds to your experience, helping you become more comfortable with bike handling and trail navigation. Dedicate time to practice regularly, even if it’s short rides or repeating familiar trails.
Benefits of Taking Formal Lessons:
- Qualified Instructors: Learning from experienced professionals can provide you with structured guidance and valuable tips tailored to your skill level.
- Skill Development: Clinics often focus on specific techniques such as cornering, braking, or descending, which are vital for safe and confident riding.
Riding with More Experienced Friends or Joining Group Rides:
- Mentorship: Riding alongside skilled bikers offers mentorship opportunities where you can observe their techniques and receive instant feedback.
- Community Support: Group rides foster a supportive environment, making the learning process enjoyable and encouraging.
Engaging in community activities like group rides or clinics not only helps in skill development but also builds a network of fellow riders who share your passion. Embrace these experiences to gain confidence and enhance your mountain biking journey.
Conclusion
As a beginner, starting mountain biking trails opens up a world of adventure, skill-building, and personal growth. Each ride offers new lessons, from mastering basic bike handling to discovering your favorite type of terrain. The sense of accomplishment that comes with riding a new trail or overcoming an obstacle is unmatched. Embrace every moment on the trail—whether you’re rolling through smooth singletrack or taking on your first technical section—as part of your journey into the MTB community. Every pedal stroke brings you closer to greater confidence and countless memorable rides.