Proper bike maintenance is the foundation of a safe and enjoyable cycling experience, especially for new riders. Without regular care, even the best bike can develop issues that compromise both comfort and reliability. Neglecting routine checks often leads to costly repairs or unexpected breakdowns on the road.
Key takeaway:
Regular bike maintenance not only ensures a smooth and enjoyable ride but also prolongs the lifespan of your bike.
In this guide, you’ll find:
- The essential tools every new rider should have
- Step-by-step adjustments for comfort and safety
- Simple pre-ride safety checks
- Tips for fixing common issues like flat tires
- Proven methods for cleaning and caring for your bike’s components
This blog, A Comprehensive Guide to Bike Maintenance for New Riders, gives you the confidence to keep your bike running smoothly—no matter where your ride takes you.
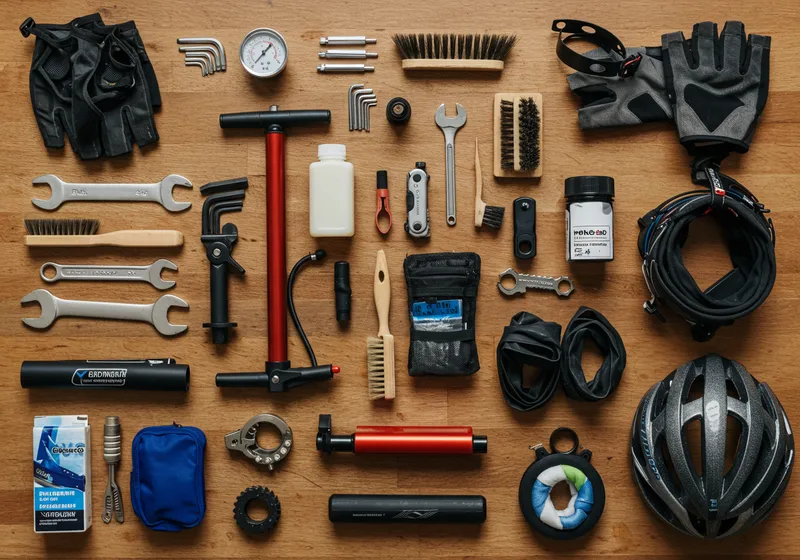
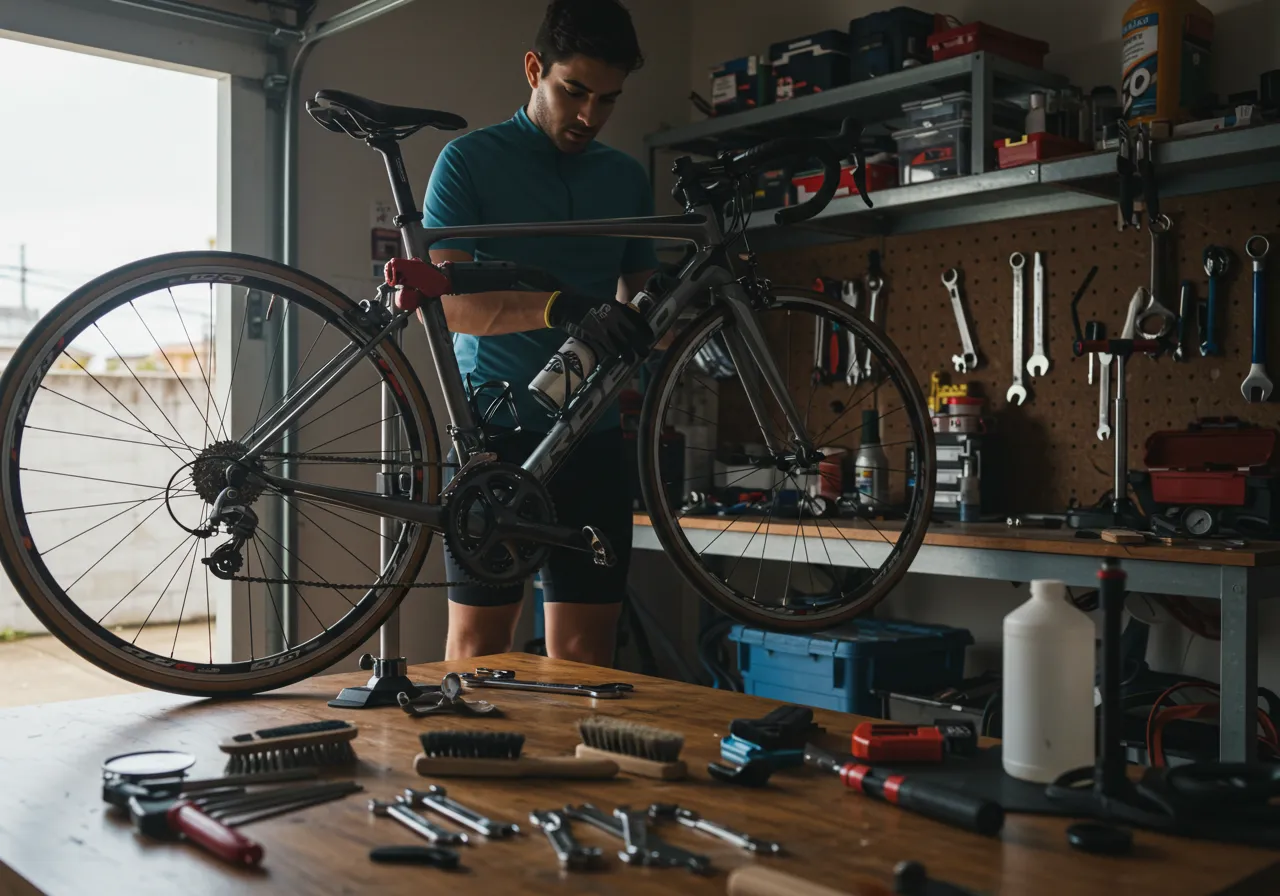
Essential Bike Maintenance Tools
Having the right tools for bike maintenance is crucial. Proper tools make the task easier and ensure you can address any issues that arise while riding.
Here are some essential tools every new rider should have:
1. Floor Pump with Gauge
Importance: Maintaining the correct tire pressure is vital for a smooth ride and avoiding flats.
Usage: Regularly check and inflate your tires to the recommended pressure using the gauge to ensure accuracy.
2. Allen Wrenches
Importance: Many bike components, such as seat posts, handlebars, and brakes, use Allen bolts.
Usage: Use different sizes (typically 4mm, 5mm, and 6mm) to tighten or loosen bolts, ensuring components are secure.
3. Adjustable Crescent Wrenches
Importance: Versatile tool for various nuts and bolts on your bike.
Usage: Adjust to fit different sizes of nuts and bolts, providing a firm grip without rounding off the edges.
4. Bike Wash Supplies
Importance: Keeping your bike clean prevents rust and wear on moving parts.
Usage: Use soap, water, brushes, and degreasers to clean your bike regularly. Dry thoroughly to prevent rusting.
5. On-the-Bike Repair Kit
Key Items:
- Tire levers
- Spare inner tubes
- Puncture repair kit
- Multi-tool
- Mini pump or CO2 inflator
Importance: Essential for fixing common issues like flat tires when you’re away from home.
Usage:
- Use tire levers to remove the tire from the rim.
- Replace or patch inner tubes using the repair kit.
- Tighten loose bolts with a multi-tool.
- Inflate tires with a mini pump or CO2 inflator.
Each of these tools plays a critical role in maintaining your bike’s performance and ensuring a safe ride. Regular usage of these tools helps in addressing small problems before they become major issues.
Adjusting Bike Components for Comfort and Safety
Importance of Adjusting Saddle Height for Comfort and Efficiency
Proper saddle height adjustment is crucial for a comfortable and efficient ride. When the saddle height is correctly set, you can pedal more effectively, which reduces the risk of knee pain and enhances overall riding performance. An ideal saddle height allows your leg to extend almost fully at the bottom of the pedal stroke without causing strain on your knees.
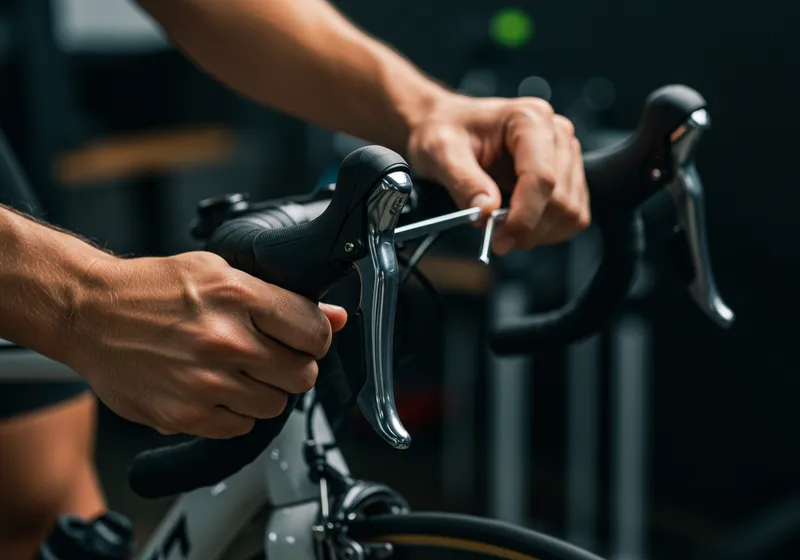
Step-by-Step Guide on Adjusting Brake Levers and Shifters for Optimal Reach
Adjusting brake levers and shifters is essential for safety and comfort, ensuring they are within easy reach. This prevents hand fatigue during long rides and enables quick braking response.
Steps to Adjust Brake Levers:
- Position Yourself: Sit on your bike in a riding position.
- Loosen Clamp Bolts: Use an Allen wrench to loosen the clamp bolts that secure the brake levers.
- Adjust Angle: Rotate the brake levers so that they align comfortably with your fingers when gripping the handlebars.
- Tighten Bolts: Once positioned correctly, tighten the clamp bolts securely.
Steps to Adjust Shifters:
- Locate Clamp Bolts: Identify the bolts securing the shifters to the handlebars.
- Loosen Bolts: Use an appropriate tool (usually an Allen wrench) to loosen them.
- Position Shifters: Move the shifters to a position where you can easily operate them without straining your fingers.
- Secure Shifters: Tighten the bolts firmly after adjusting to ensure they don’t move during rides.
Ensuring both saddle height and component adjustments are done accurately will significantly improve your riding experience by offering enhanced comfort and control.
Performing a Pre-Ride Safety Check and Flat Tire Repair
A reliable bike starts with a quick but essential routine before every ride—the ABC safety check (Air, Brakes, Chain). This habit helps prevent unexpected mechanical issues and keeps your rides safe and enjoyable.
Step-by-Step: ABC Safety Check
Air
- Squeeze both tires to check firmness. Underinflated tires increase the risk of flats and make pedaling harder.
- Use a floor pump with a gauge to match the tire pressure recommended on the tire sidewall.
Brakes
- Squeeze brake levers to make sure they engage firmly without touching the handlebars.
- Inspect pads for wear—replace if they look thin or uneven.
- Spin wheels to ensure there’s no rubbing or unusual drag from the brakes.
Chain
- Examine the chain for visible rust, dirt, or stiff links.
- Rotate pedals backward; the chain should move smoothly and quietly.
Neglecting any part of this simple routine can turn a pleasant ride into a frustrating one.
Flat Tire Repair On the Go
Dealing with flats is part of cycling. Knowing how to handle them quickly means less stress on solo rides or group adventures.
Always carry at least one spare inner tube, compact tire levers, and a mini pump or CO₂ inflator.
If you pick up a puncture:
Shift gears so the chain is on the smallest cog—makes wheel removal easier.
Release brakes (if rim brakes) and remove the wheel.
Use tire levers to carefully pry off one edge of the tire bead.
Remove the old tube, check inside the tire for sharp objects, then insert your spare inner tube.
Partially inflate, reseat the tire bead, then fully inflate to proper pressure.
Puncture repair kits are a backup option when spares run out—patching tubes takes extra time, but gets you home. Practicing these steps before your first big ride builds confidence for real-world situations.
Carrying spare inner tubes and puncture repair kits isn’t just smart—it’s essential preparation highlighted in “A Comprehensive Guide to Bike Maintenance for New Riders.” This level of readiness sets a foundation for independence on every journey.
Routine Bike Maintenance Tips
Staying on top of routine bike maintenance prevents unexpected breakdowns and extends the lifespan of every component. Two habits make a significant difference: consistent tire pressure checks and regular bike cleaning.
Tire Pressure Check
- Use a reliable floor pump with an integrated gauge to check your tire pressure before every ride. Tires lose air gradually, so even if they look fine, they may be underinflated.
- Proper inflation improves rolling efficiency, handling, and puncture resistance. Underinflated tires increase the risk of pinch flats, while overinflated tires can cause a harsh ride and less traction.
- Refer to the sidewall of your tire for recommended PSI (pounds per square inch) and adjust based on your weight, terrain, and riding style.
Regular Bike Cleaning
- Dirt, grime, and moisture accelerate wear on your drivetrain and other moving parts. A quick wipe-down after wet or muddy rides keeps grit from grinding away at components.
- Use gentle brushes or sponges with bike-specific cleaners to remove debris from the frame, wheels, chainrings, cassette, and derailleurs.
- Rinse with clean water—avoiding direct high-pressure sprays at bearings—and dry thoroughly with a soft cloth to prevent rust.
- Degrease and re-lubricate the chain regularly. Excess buildup attracts dirt, and too little lubrication causes premature wear.
Keeping these habits consistent maintains peak performance and reduces costly repairs. Clean bikes are easier to inspect for issues like cracks or loose bolts during maintenance sessions.
Brake Maintenance, Gear Indexing, and Chain Care
Inspecting Rim Brake Pads for Wear and Tension
Ensuring your rim brake pads are in optimal condition is crucial for safety and performance. Regular inspection helps identify wear and tension issues before they become problematic.
Here’s how to inspect your rim brake pads:
- Visual Check: Look for uneven wear or thinning of the brake pad material. Replace pads if the grooves are no longer visible.
- Tension Test: Squeeze the brake lever and ensure it engages firmly without touching the handlebars. If the lever feels loose or too tight, adjust the cable tension.
- Alignment: Make sure the brake pads are aligned correctly with the rim surface. They should make full contact without rubbing against the tire or missing parts of the rim.
Maintaining Gear Indexing through Cable Tension Adjustments
Proper gear indexing ensures smooth and efficient shifting. Adjusting cable tension is a key part of maintaining this functionality.
Follow these steps to keep your gears indexed:
- Shift through Gears: Shift through all gears to identify any misalignment or hesitation.
- Adjust Barrel Adjuster: Use the barrel adjuster located near the shifter or derailleur to fine-tune cable tension. Turn clockwise to tighten and counterclockwise to loosen.
- Test Ride: After adjustment, take a brief test ride to confirm smooth shifting across all gears.
- Limit Screws: If necessary, adjust limit screws on the derailleur to prevent the chain from overshooting the cassette or chainrings.
Regularly checking rim brake pads and maintaining proper gear indexing through cable tension adjustments will ensure a safer, smoother ride experience.
Advanced Chain Maintenance Techniques and Seeking Professional Help
Handling a snapped or broken chain on the road can be intimidating for new riders, but knowing how to use a multi-tool with a chain breaker function prepares you for unexpected issues. Broken chains repair starts by removing the damaged link. Using a joining pin or a quick link, you reconnect the chain so you can keep riding. Quick links are user-friendly—simply insert both ends and pull until they click together. Carrying a quick link compatible with your chain is strongly recommended.
Professional servicing offers advantages that routine home maintenance can’t match. Bike shops use precision tools to measure chain wear and inspect drivetrain alignment. Technicians spot subtle issues like bent derailleur hangers or worn cassette teeth, preventing costly failures down the line. Scheduling periodic check-ups ensures your bike’s performance stays at its best, especially after long rides or harsh weather conditions.
A Comprehensive Guide to Bike Maintenance for New Riders emphasizes developing both self-reliance and knowing when expert help is needed.
Conclusion
Bike maintenance is essential for a safe and enjoyable riding experience. By taking care of your bike regularly, you not only protect your investment but also develop a stronger bond with your bike. A Comprehensive Guide to Bike Maintenance for New Riders serves as a practical guide—use it to boost your confidence, acquire new skills, and avoid unexpected breakdowns. Each maintenance task allows you to gain a deeper understanding of your bike and fully appreciate every ride. Always have your toolkit nearby and incorporate each check into your cycling routine—the benefits are both instant and enduring.